

Shooting video in low light, like a dimly lit café, a dark indoor event, or outdoors at night, is often a challenge. The footage can come out dark, soft, or full of distracting noise. But it’s not impossible. With the right camera settings, even the darkest conditions can still give you footage that’s worth watching.
Last month, I had a project documenting a product launch at an art gallery in Kota Lama, Semarang. The event started in the late afternoon and ran into the night. The lighting was a mix of dim gallery lamps and the fading daylight outside. The client wanted a video that still had detail and kept the atmosphere of the place. It’s a classic scenario that really tests both the camera and the videographer’s skills.
Many people think the main problem when shooting in low light is the lack of light. True, but it’s not the only one. Fixing the lack of light the wrong way can actually make the video worse. The key is balancing getting enough light in with keeping the image clean.
1. Open Your Aperture as Wide as Possible (Small F-Number)
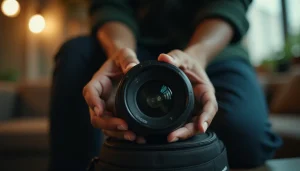
The first and most crucial step is to maximize your lens opening. The aperture (lens opening) controls how much light reaches the camera sensor. The smaller the f-stop number (for example f/1.8, f/2.8), the wider the opening and the more light you can capture.
When shooting in low light, try to use a lens whose maximum aperture opens as wide as possible. If you have the kit lens that came with your camera, usually with an f/3.5-5.6 aperture, it will hold you back a lot. Ideally, use a prime lens (a lens with a fixed focal length) like a 50mm f/1.8, or a professional zoom lens with a constant aperture of f/2.8 or wider. My camera, the Lumix S5, gets a big boost from the Lumix S 50mm f/1.8 lens in situations like this.
Remember, opening the aperture as wide as possible also makes the depth of field (the area that stays sharp) very shallow. This means your main subject has to be in focus, because whatever is in front of or behind it will look blurry (bokeh). That can be an advantage for isolating the subject, but it’s also a challenge to keep focus accurate, especially if the subject is moving.
2. Raise ISO Only as Much as You Need: Know Your Camera’s Limits
Once you’ve maxed out the aperture, the next step is ISO. ISO is how sensitive the camera sensor is to light. Raising the ISO makes the image brighter, but it comes at a cost: noise (rough speckles in the image).
Every camera has a different “clean” ISO limit. A high-end professional camera might still produce a fairly clean image at ISO 3200 or 6400, while an entry-level camera might already look very noisy at ISO 1600. It’s important that you know the limits of the camera you use. Run a test at home by raising the ISO step by step and see at which ISO the noise starts to bother you.
On that art gallery project, I used the Lumix S5. I find ISO 1600 still very clean. ISO 3200 is still acceptable with a bit of noise reduction in the edit. I try hard not to go past ISO 3200 so the image quality holds up. If I’m forced to go higher, I’m ready to do some post-processing to reduce the noise.
3. Shutter Speed: Stick to the 180-Degree Rule
Shutter speed determines how long the sensor is exposed to light. The most common rule for video is the “180-degree rule.” It suggests setting your shutter speed to double your frame rate (the number of frames per second).
For example:
- If you shoot at 25 fps (frames per second), your shutter speed should ideally be around 1/50 of a second.
- If you shoot at 30 fps, your shutter speed should ideally be around 1/60 of a second.
- If you shoot at 50 fps, your shutter speed should ideally be around 1/100 of a second.
Why does this matter? Setting your shutter speed according to the 180-degree rule gives you motion blur (the trail effect of movement) that looks natural and pleasant to the eye. If the shutter speed is too fast (for example 1/250 of a second while shooting at 25 fps), movement looks choppy and stiff, a kind of stutter effect.
When shooting in low light, it’s tempting to slow the shutter down to let in more light. But don’t do it if you want video that looks cinematic and natural. Stick to the 180-degree rule. If you need more light, raise the ISO or use extra lighting; don’t sacrifice your shutter speed.
4. Choose a Fast Lens
This point comes back to aperture, but this time from the gear side. A “fast” lens is a lens that can open wide (a small f-number). Lenses with an f/1.8, f/1.4, or f/2.8 aperture are the best choices for low light.
On the art gallery project, I relied on the Lumix S 50mm f/1.8 and the Lumix S 24-105mm f/4. Even though f/4 isn’t the widest, its zoom range is flexible. But for the darkest moments, I always switched to the 50mm f/1.8. That lens let me capture detail in areas that looked pitch black with the f/4 lens.
If you’re just starting out, investing in one wide-aperture prime lens (for example a 35mm or 50mm f/1.8) can make a huge difference to your video quality in low light.
5. Shoot in a Flat or LOG Profile
When recording video, cameras usually save the image in a standard color profile (like Rec. 709). This profile has already been “processed” by the camera, so the colors and contrast look good straight out of camera. But it limits your flexibility in the edit.
A “Flat” or “LOG” profile (like V-Log on Lumix, S-Log on Sony, C-Log on Canon) records the image with minimal contrast and saturation. It looks pale and flat. The upside is that these profiles keep more detail in the highlights (bright areas) and shadows (dark areas). This gives you far more room when you do color grading (adjusting color and tone) in editing software like DaVinci Resolve.
LOG footage does need color grading to look good. But if you want the best result and have time for editing, it’s a step I highly recommend.
6. Use the Light That’s Already There, Add More if Needed
Don’t underestimate the light that’s already available on location. In a café, make use of table lamps or windows. At a night event, use the stage lights or the ambient lights around you.
Often, though, the existing light isn’t enough or isn’t in the right place. That’s where portable lights save the day. Small LED lights that mount on the camera or on a mini tripod help a lot. For example, the Aputure Amaran 150 RGB gives you color flexibility if you want to get a little creative, or the Aputure Amaran 60x for more controlled white light.
On the art gallery project, I first relied only on the gallery lights. But because some areas were too dark for interviews, I used one Aputure Amaran 60x mounted on a small tripod outside the frame, pointed at the interviewee to add a little “fill light” so their face was clearly visible without ruining the atmosphere of the room.
7. Set White Balance Manually
Different light sources have different color temperatures. Incandescent bulbs tend to be yellowish, LED lights can be all sorts of things, and late-afternoon sunlight is different from midday sun.
If you leave white balance on “Auto,” the camera keeps adjusting itself, which makes the colors flicker between shots or even within the same shot. That’s a real headache in the edit.
The fix is to set your white balance manually. Bring a sheet of white paper or a grey card to the location. Point the camera at the paper or card under the main light you’ll be using, then set the white balance manually following your camera’s instructions. If you don’t have white paper, you can set it based on the dominant light source (for example, if the stage lights are mostly yellow, set the WB toward “tungsten”). This keeps your colors consistent across all your footage.
These seven settings cover for each other: a wide aperture and ISO to bring the light in, a 180-degree shutter and manual white balance to keep the result clean. But what saves me most often in the field isn’t any one trick — it’s knowing exactly at which ISO my own camera starts to break up. You only get that from testing your camera before the shoot day, not when the client is already waiting at a dimly lit location.
Need a visual production team for a project in Semarang? Labstory is a production house based in Semarang. See Labstory’s portfolio for examples of our work, or get to know our team and approach.
FAQ
What is the highest safe ISO for video?
Every camera has a different clean ISO limit. Test your own camera. Generally, ISO 1600–3200 is still safe on many modern mirrorless cameras, but this varies a lot.
Is an f/2.8 lens enough for low light?
Yes, f/2.8 is good enough for many low-light situations, especially when combined with a slightly raised ISO and some extra lighting. But an f/1.8 or f/1.4 lens gives you more of an edge.
What is a LOG profile and why does it matter in low light?
A LOG (logarithmic) profile records footage with a wider dynamic range, keeping more detail in the bright and dark areas. This helps a lot in post-production when you want accurate color and visible detail in low-light footage.
How do I deal with excessive motion blur in low-light video?
Keep your shutter speed on the 180-degree rule (around 1/50 for 25fps). If motion blur still looks excessive because the subject moves fast, consider adding light so you can use a slightly faster shutter speed without sacrificing image brightness.
Do I need extra lights if I already use an f/1.8 lens?
Not always. If the ambient light is enough with an f/1.8 lens and an ISO that is still clean, extra lights may not be needed. Still, extra lights are very useful for adding detail, controlling shadows, or when the ambient light just isn’t enough.
Leave a Reply